How to Tie a Sailors Knot
How to Tie 5 Sailing Knots Recommended by US Sailing
"Tie me a figure 8", "grab that cleat hitch", "fasten a bowline" – next time you're aboard or at the docks, make yourself useful to the captain and crew and earn your passage. As they say, practice makes perfect. So whether you're learning a new skill or brushing up on your technique, keep reading to learn about the top five sailing knots recommended by US Sailing coach Chris Childers.
Boating is arguably the oldest mode of transportation, next to walking, and for as long as people have been boating, they have been tying knots. Marlinspike seamanship refers to the different uses of ropes, lines, and knots in the maritime tradition. It's an essential skill in sailing, but you'll also find yourself using the five knots below in places you might not expect. But first, some vocabulary. When a rope is cut to a certain length and given a job, it becomes a line. The end of the line you use in a knot is the bitter end or the working end. The rest of the line, in between the knot and the boat, rig, or whatever job it's doing, is the standing part.

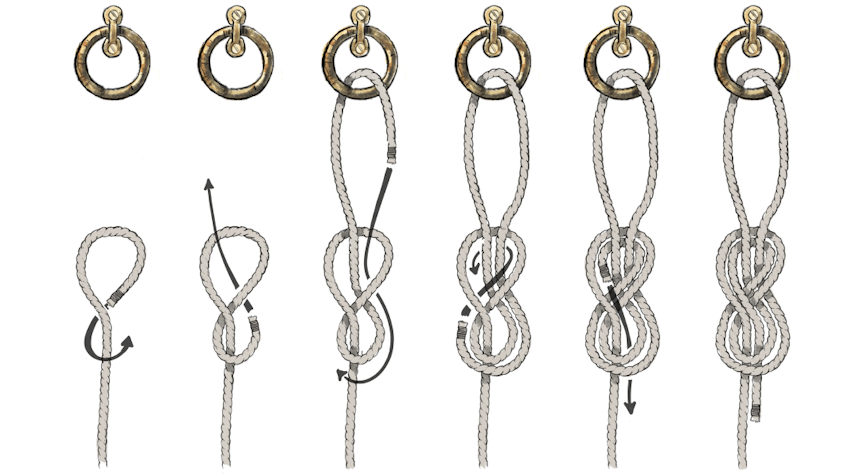
FIGURE 8
Knots can be classified by their use: stopper knots stop a line from running back through a fairlead, block, or eye. Most lines are controlling sails and spars at the other end of the boat and these knots keep the pulling end from running away. There are many different stopper knots you can use, but the Figure 8 is quick and easy to learn. Like all good knots, it will hold fast under load but is easy to untie.
Take the bitter end of a line and cross it over the top of the standing part. Continuing back towards the standing end, cross under the standing part this time before threading through the loop you made after the first cross. Pull it tight with enough of a tail to grab.

SHEET BEND
The sheet bend is the right tool for several jobs on a boat. If you need to join (orbend) two lines together, to lengthen an anchor line, attach to a tow line, or for an at-sea repair of running rigging, this is your knot. It also works great even if the lines are different diameters.
If your lines are two different thicknesses, then start with the thicker of the two. If they are the same diameter, it does not matter which you use to start. With the first line, create a bight in the line by folding the bitter end back alongside its own standing part. Next, take the second line and bring its bitter end through the bight, between the fold. Lead it around the back of the bight and then under its own standing part.

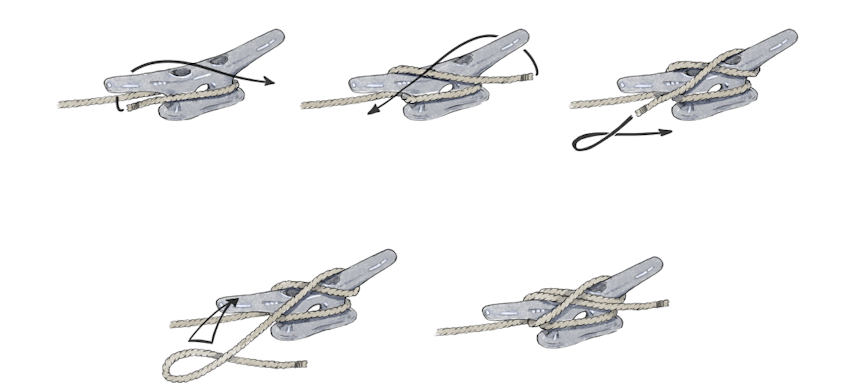
CLEAT HITCH
A hitch is a knot used to tie a line to a fixed object, in this case, a horn cleat. You'll find horn cleats on docks to tie your boat up, on the mast to secure halyards, and everywhere in between. It's easy to spy a rookie by their poor cleat hitch, so make sure you've got this one right.
Lead the line to wrap it around the cleat's furthest horn from the near side to the far side. Add another wrap around the following horn, then cross over the middle of the cleat on your way to the next one. For the locking hitch, grab a bight and give a twist—you should end up with the characteristic two rivers under one bridge.

ROLLING HITCH
This useful knot has countless applications on a boat. It's usually tied onto another line or a cylindrical object like a stanchion or lifeline. This knot won't slip or slide, which makes it perfect for taking the load off another line or, as part of a purchase or pulley system, cinching a line tight.
Begin wrapping the first line with the second, with the wraps proceeding in the direction in which you do not want the second line to slip—wrap the line at least twice. Then continue wrapping the second line around the first, but now cross back over the wraps you have already made. Finish with a half hitch.

BOWLINE
The bowline is perhaps the most important knot a sailor can learn—practice this one until you can do it with your eyes closed. Technically, it creates a fixed loop at the end of the line, but the possibilities are endless. Tie this around the mast on small boats when towing. Tie it to the corner of your sails so you can pull them in. Tie it around the dog so he doesn't fall off. For maximum stability, a good bowline should have a tail on the inside (not the outside) of the created loop that is about as long as that loop.
First, create a loop in the line where the part nearest the bitter end crosses over the top of the part closest to the standing end. This loop becomes thehole, the standing part becomes thetree, and the bitter end becomes therabbit. The common pneumonic goes: therabbit comes out of thehole, around the back of thetree, then back through thehole. Tighten by pulling the rabbit and the top of the loop against the tree.

The United States Sailing Association (US Sailing) is the national governing body for sailing in the United States. Founded in 1897 and headquartered in Bristol, Rhode Island, US Sailing is a 501(c) (3) non-profit organization. US Sailing offers training and education programs for instructors and race officials, supports a wide range of sailing organizations and communities, issues offshore rating certificates, and provides administration and oversight of competitive sailing across the country, including National Championships and the US Sailing Team. To get involved and learn more about sailing, or find your local club, visit US Sailing's Where to Sail page.
Source: https://www.filson.com/blog/how-to/tie-5-crucial-sailing-knots/
0 Response to "How to Tie a Sailors Knot"
Post a Comment